Easy No-Knead Artisan Bread

There’s something undeniably comforting about the smell of freshly baked bread drifting through your kitchen. It’s the kind of scent that makes a house feel like home — warm, welcoming, and full of love. Now imagine pulling out a golden, crusty loaf that looks like it came straight from a bakery… except you made it yourself, without kneading, mixers, or fancy equipment.
That’s the beauty of Easy No-Knead Artisan Bread. With just a few simple ingredients and a bit of patience, you can create a loaf that’s crisp on the outside, soft and airy on the inside, and full of that rustic flavor you’d expect from professional bakers. It’s effortless, satisfying, and almost magical.
Why You’ll Fall in Love with No-Knead Artisan Bread
Baking bread can seem intimidating, but this recipe changes everything. The no-knead method is perfect if you’ve always wanted to bake homemade bread but didn’t know where to start. You don’t need to spend time kneading or shaping — time and yeast do the work for you.
Here’s why it’s worth trying:
-
No experience needed: Even if you’ve never baked bread before, this recipe is foolproof.
-
Minimal effort: Just mix, rest, and bake — no kneading required.
-
Incredible texture: Crispy crust and soft, chewy inside.
-
Budget-friendly: Made from basic pantry ingredients.
-
Versatile: Customize with herbs, cheese, or seeds for unique flavors.
This method makes baking bread less about perfection and more about the joy of creating something simple, rustic, and deeply satisfying.
What Makes Easy No-Knead Artisan Bread So Special
The Science Behind the No-Knead Method
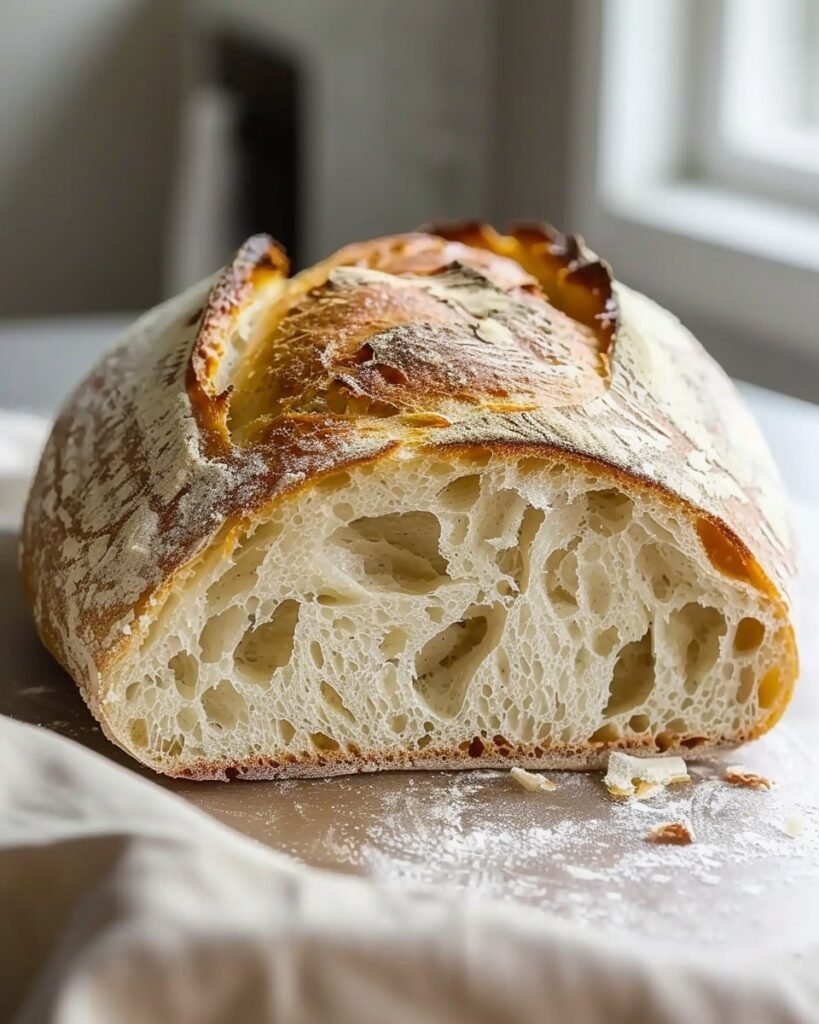
Traditional bread recipes rely on kneading to develop gluten — the protein structure that gives bread its texture. But here’s the secret: when you let the dough rest for a long period (usually 12–18 hours), gluten develops naturally.
This slow fermentation process allows the yeast to break down and strengthen the dough on its own, building flavor and texture without any effort on your part. You’re basically letting time do the kneading for you.
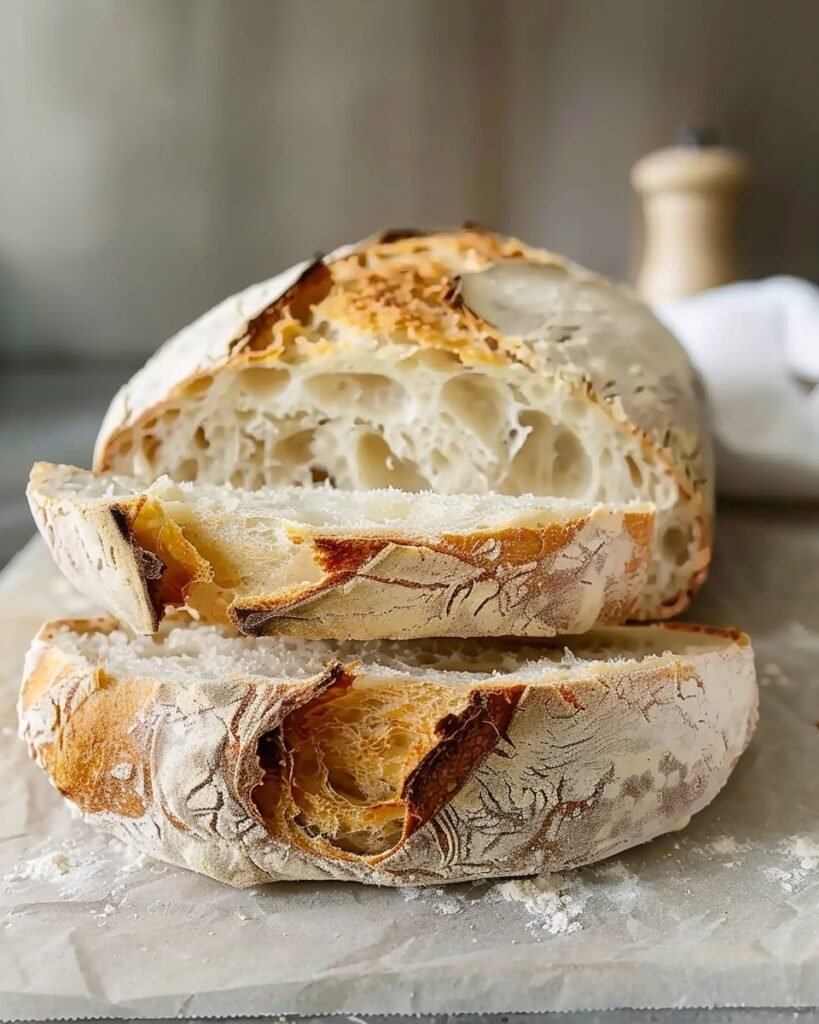
The Perfect Crust and Texture
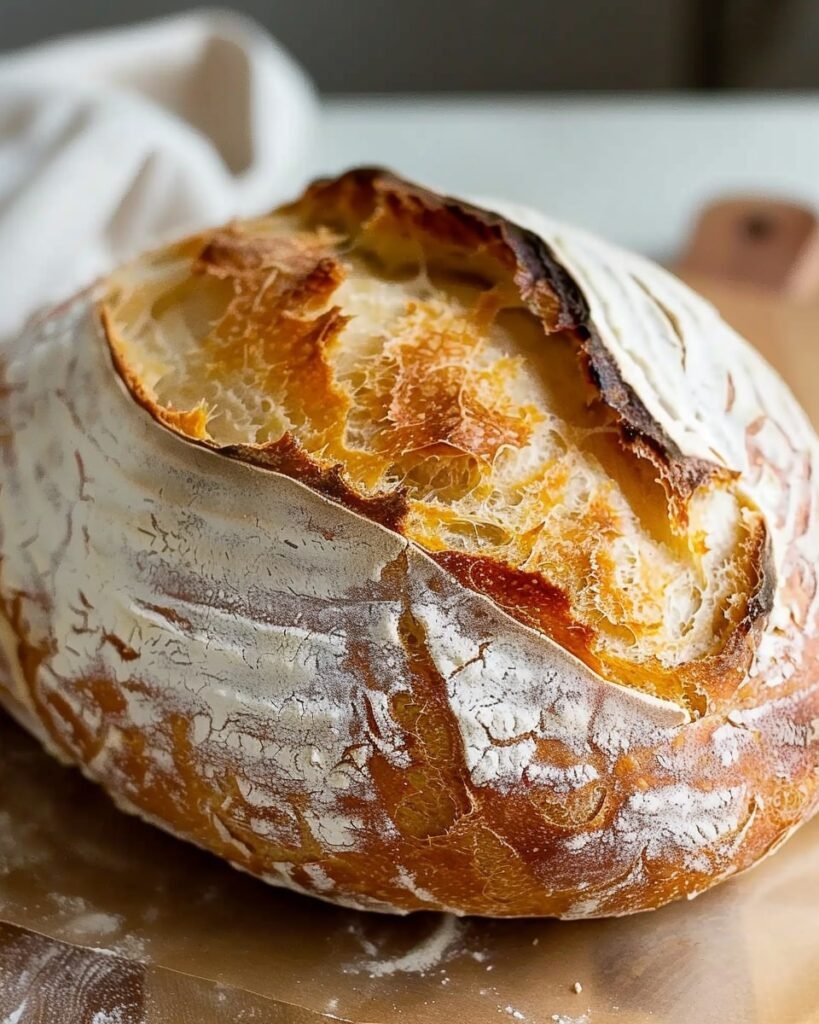
When baked in a hot, covered pot (like a Dutch oven), the dough steams itself, creating that iconic crackly crust. Once you remove the lid, the crust browns beautifully, while the inside stays soft and pillowy.
The result? A loaf that looks and tastes like it came from a bakery — crisp on the outside, airy on the inside, and full of depth and aroma.
Ingredients You’ll Need for Easy No-Knead Artisan Bread
You only need four basic ingredients to make the classic version:
Basic Ingredients
-
3 cups all-purpose or bread flour
-
1 ½ teaspoons salt
-
½ teaspoon instant yeast
-
1 ½ cups warm water
That’s it. No eggs, milk, or butter — just the essentials that create something extraordinary.
Optional Add-Ins for Variety
If you want to switch things up, try adding:
-
Fresh or dried herbs like rosemary, thyme, or oregano
-
Grated cheese for a cheesy crust
-
Seeds (flax, sunflower, or sesame) for texture
-
Minced garlic or olives for savory flavor
Even with small additions, this bread stays simple, yet every variation feels special.
Step-by-Step Guide to Making No-Knead Artisan Bread
This recipe couldn’t be easier. You’ll spend less than 10 minutes on hands-on work.
Step 1 – Mix the Dough
In a large bowl, combine flour, salt, and yeast. Add the warm water and stir with a wooden spoon until you get a sticky, shaggy dough. It won’t look perfect — that’s exactly how it should be. Cover the bowl with plastic wrap or a clean towel.
Step 2 – Let It Rest
Leave the dough at room temperature for 12 to 18 hours. During this time, the yeast ferments slowly, developing flavor and texture. When it’s ready, the dough will be bubbly and doubled in size.
Step 3 – Shape the Dough
Lightly flour your hands and surface, then gently shape the dough into a round loaf. Don’t knead — just fold it over itself a few times. Let it rest for another 30 minutes while you preheat the oven.
Step 4 – Preheat the Oven and Pot
Place a Dutch oven (or heavy oven-safe pot) inside your oven and preheat it to 450°F (230°C). Heating the pot beforehand ensures a crisp crust once the dough hits the hot surface.
Step 5 – Bake to Perfection
Carefully place the dough into the hot pot (use parchment paper for easy transfer), cover, and bake for 30 minutes. Then remove the lid and bake for another 10–15 minutes until golden and crisp.
Step 6 – Cool Before Slicing
Let your bread cool for at least 30 minutes before cutting. It’s tempting to slice right away, but letting it rest helps preserve the texture and keeps the crumb light and airy.
Tips for the Best No-KneadArtisan Bread
Even though this recipe is easy, a few small adjustments can make your bread even better:
Baking Tips
-
Use a cast iron pot: It retains heat evenly, giving your loaf that signature crust.
-
Adjust resting time: If your kitchen is cold, let it ferment longer.
-
Don’t rush: The long resting time is what gives the bread its deep flavor.
-
Steam is your friend: If you don’t have a Dutch oven, place a pan of water in the oven to create steam.
Storage & Reheating Tips
-
Store your bread in a paper bag or wrapped in a towel at room temperature.
-
Reheat slices in the oven for 5–10 minutes at 350°F to bring back that crispy crust.
-
Freeze extra slices and reheat directly from the freezer when needed.
Creative Variations to Try
The basic no-knead recipe is just the start. Once you’ve mastered it, you can experiment with endless variations.
Whole Wheat Version
Replace half of the all-purpose flour with whole wheat flour. It adds a nutty flavor and extra fiber. You can also stir in a tablespoon of honey for a hint of sweetness.
Garlic Herb Bread
Mix in minced garlic, dried herbs, and a drizzle of olive oil before baking for a savory twist.
Cheesy Crust Bread
Sprinkle shredded cheese over the dough before baking. You’ll get a golden, crispy top and a slightly gooey interior.
Health Benefits of Homemade No-Knead Artisan Bread
Making bread at home isn’t just about the flavor — it’s about knowing exactly what goes into your food.
-
Fewer additives: Unlike store-bought loaves, homemade bread has no preservatives or unnecessary ingredients.
-
Better digestion: The long fermentation process helps break down gluten, making it easier to digest for some people.
-
Customizable nutrition: You can reduce salt, use whole grains, or add seeds for extra nutrients.
-
Mindful eating: There’s something deeply grounding about baking from scratch — it slows you down and connects you with your food.
Serving Ideas for Your No-Knead Bread
Once you’ve baked your loaf, you’ll find endless ways to enjoy it:
-
Toast: Spread with butter, jam, or avocado for breakfast.
-
Soups and stews: Use as a hearty side to soak up rich flavors.
-
Sandwiches: Its sturdy crust makes it perfect for grilled cheese or deli-style sandwiches.
-
Bruschetta: Top with tomatoes, basil, and olive oil for a quick appetizer.
-
Croutons: Cube and bake leftover slices for homemade croutons.
Frequently Asked Questions
Can I use active dry yeast instead of instant yeast?
Yes. Just dissolve it in warm water for about 5 minutes before mixing it with the flour.
What if I don’t have a Dutch oven?
You can bake on a preheated baking sheet and cover the dough with an oven-safe bowl to trap steam.
How long does homemade bread stay fresh?
It’s best enjoyed within 2–3 days, but you can freeze it for longer storage.
Can I make this gluten-free?
Yes — use a 1:1 gluten-free flour blend. The texture will be slightly different, but still delicious.
Why did my bread turn out dense?
That usually means the dough didn’t ferment long enough or the yeast was inactive. Always check expiration dates and let the dough rise fully.
Conclusion
With just a bowl, a spoon, and a bit of time, you can create something extraordinary. Easy No-Knead Artisan Bread proves that homemade bread doesn’t need to be complicated — it just needs care and patience.

Easy No-Knead Artisan Bread
Ingredients
- Basic Ingredients
- 3 cups all-purpose or bread flour
- 1 ½ teaspoons salt
- ½ teaspoon instant yeast
- 1 ½ cups warm water
- Optional Add-Ins
- Fresh or dried herbs rosemary, thyme, oregano
- Grated cheese cheddar, parmesan
- Seeds flax, sesame, sunflower
- Minced garlic or olives
Instructions
- Mix the Dough: In a large bowl, combine flour, salt, and yeast. Add warm water and stir until you have a sticky dough. Cover and let rest.
- Let It Rise: Leave the dough at room temperature for 12–18 hours until doubled and bubbly.
- Shape the Dough: Lightly flour your hands and gently shape into a round loaf. Rest for 30 minutes.
- Preheat the Oven: Place a Dutch oven inside and preheat to 450°F (230°C).
- Bake: Place the dough into the hot pot, cover, and bake for 30 minutes. Remove the lid and bake for another 10–15 minutes until golden brown.
- Cool: Let the bread cool for at least 30 minutes before slicing.
Notes
- For extra flavor, add herbs or cheese before baking.
- Use a cast iron Dutch oven for the crispiest crust.
- Let dough ferment longer in a cool kitchen for deeper flavor.
- Store in a paper bag or towel at room temperature for up to 3 days.
- Freeze slices for easy reheating later.