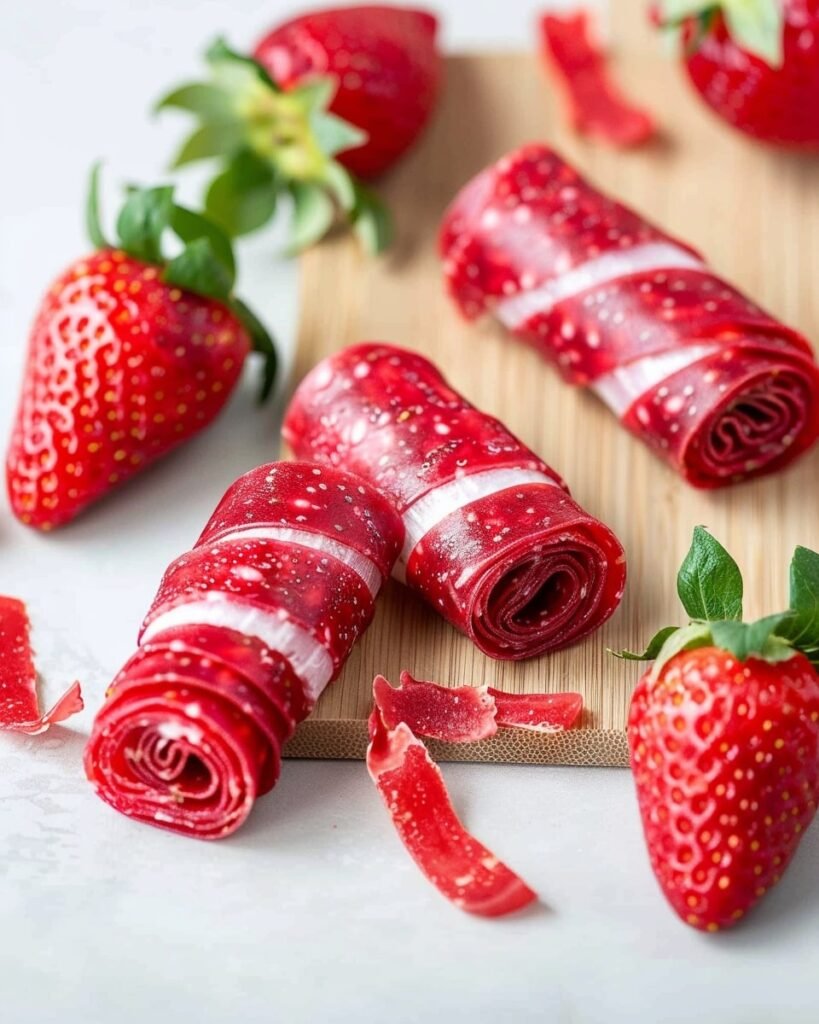
Easy Homemade Fruit Roll Ups Recipe

There’s something about peeling back a fruit roll up that instantly brings a smile to your face. Maybe it reminds you of childhood lunchboxes, after-school snacks, or that fun moment of unrolling the chewy treat bite by bite. While store-bought fruit roll ups are fun, they’re often packed with added sugars, artificial colors, and preservatives. If you’ve ever wished for a healthier, homemade version that you can feel good about eating or sharing with your kids you’re in the right place.
With this simple recipe, you’ll learn how to make homemade fruit roll ups using just a few natural ingredients. They’re fruity, chewy, customizable, and surprisingly easy to prepare right in your kitchen.
Why Make Homemade Fruit Roll Ups?
-
Healthier ingredients – no artificial flavors, dyes, or unnecessary additives.
-
Customizable – choose your favorite fruits or combinations.
-
Budget-friendly – make a big batch for less than store-bought packs.
-
Kid-approved – fun to make and eat, perfect for lunchboxes or after-school snacks.
-
Shelf-stable – easy to store, making them ideal for meal prep and snacking on the go.
Ingredients for Easy Homemade Fruit Roll Ups Recipe
Core Ingredients:
-
Fruit – fresh or frozen (berries, mangoes, apples, peaches, or mixed fruits all work).
-
Sweetener (optional) – honey, maple syrup, or sugar if your fruit isn’t naturally sweet enough.
-
Lemon juice – brightens the flavor and helps preserve the fruit color.
Optional Add-Ins:
-
A pinch of cinnamon or nutmeg for warmth.
-
Chia seeds or flaxseeds for added fiber and nutrition.
-
A mix of fruits for unique blends like strawberry-banana or mango-pineapple.
Tip: Always go for ripe fruit, since that will give you maximum sweetness and flavor without needing extra sugar.
How to Make Homemade Fruit Roll Ups Step by Step
Step 1 – Prep the Fruit
Wash, peel, and chop your chosen fruit into small pieces. If using frozen fruit, let it thaw first.
Step 2 – Blend Until Smooth
Place the fruit in a blender or food processor with lemon juice and sweetener if needed. Blend until completely smooth, almost like a thick smoothie.
Step 3 – Spread & Bake
Line a baking sheet with parchment paper. Spread the puree evenly into a thin layer, about 1/8-inch thick. Avoid making it too thick, or it won’t dry properly.
Bake at a very low temperature (140–170°F / 60–75°C) for 4–6 hours. The goal is to dry it out slowly, not cook it.
Step 4 – Test for Doneness
The fruit leather should feel dry to the touch and peel off the parchment easily. If it’s still sticky, give it more time.

Step 5 – Roll & Store
Cut the sheet into strips. Roll each piece with parchment or wax paper to keep them from sticking together. Store in an airtight container.
Tips for the Best Homemade Fruit Roll Ups
-
Use ripe fruit for the best natural sweetness.
-
Blend until completely smooth—any chunks may dry unevenly.
-
Keep the layer consistent in thickness for even drying.
-
If you’re making multiple trays, rotate them halfway through baking.
-
Let the fruit leather cool completely before rolling to avoid stickiness.
Fun Variations of Fruit Roll Ups
-
Strawberry-Banana Roll Ups – classic and sweet, perfect for kids.
-
Mango-Pineapple Tropical Roll Ups – bright, tangy, and refreshing.
-
Mixed Berry Roll Ups – strawberries, raspberries, and blueberries together.
-
Apple-Cinnamon Roll Ups – tastes like apple pie in snack form.
-
Peach-Ginger Roll Ups – a unique, slightly spicy twist.
Storage and Shelf Life of Homemade Fruit Roll Ups
-
Room temperature – Store in an airtight container for up to 2 weeks.
-
Refrigerator – Keeps fresh for about 1 month.
-
Freezer – Freeze for up to 3 months.
When storing, always make sure they’re completely cooled and rolled with parchment to avoid sticking together.
Serving Ideas for Fruit Roll Ups
Homemade fruit roll ups aren’t just for kids’ lunchboxes. They make a versatile snack for all ages. Here are some ideas:
-
Pack them in school lunches.
-
Enjoy as a quick afternoon snack.
-
Take them on hikes or road trips for a lightweight, energy-boosting treat.
-
Cut into fun shapes with cookie cutters for party snacks.
-
Use them as a natural garnish for desserts.
Frequently Asked Questions
Do I need a dehydrator to make fruit roll ups?
No, you don’t. A regular oven on low heat works perfectly.

Do I need to add sugar?
Not at all. If your fruit is ripe and sweet, you can skip the sugar completely. Sweetener is optional.
How do I keep fruit roll ups from sticking?
Use parchment paper, and let the roll ups cool completely before cutting and rolling.
What fruits work best for homemade fruit roll ups?
Strawberries, mangoes, apples, blueberries, peaches, and raspberries are all excellent choices. Mixing fruits creates fun new flavors.
Can kids help make these?
Absolutely. Kids can help pick fruits, blend, spread the puree, and roll the finished product it’s a fun family activity.
Conclusion
Making homemade fruit roll ups is a simple way to bring back a nostalgic snack while keeping it healthy and customizable. With just a few ingredients and some patience, you can create chewy, fruity treats that are free from additives and packed with natural flavor. Whether you make them for yourself, your kids, or to share with friends, they’re a fun and wholesome alternative to store-bought snacks.

Healthy Homemade Fruit Roll Ups Recipe
Ingredients
- Core Ingredients:
- 3 cups fresh or frozen fruit berries, mangoes, peaches, apples, or mixed fruits
- 1–2 tablespoons honey or maple syrup optional, depending on fruit sweetness
- 1 teaspoon lemon juice
- Optional Add-Ins:
- ¼ teaspoon cinnamon or nutmeg
- 1 tablespoon chia seeds or flaxseeds
- Fruit blends like strawberry-banana or mango-pineapple
Instructions
- Prep the Fruit: Wash, peel, and chop fruit. If frozen, thaw first.
- Blend: Add fruit, lemon juice, and sweetener (if using) to a blender. Puree until smooth.
- Spread: Line a baking sheet with parchment paper. Spread puree into an even ⅛-inch layer.
- Bake/Dry: Bake at 140–170°F (60–75°C) for 4–6 hours, until dry to the touch and easily peels away from parchment.
- Cut & Roll: Cool completely. Cut into strips, roll with parchment or wax paper, and store.
Notes
- Always use ripe fruit for maximum natural sweetness.
- Blend until fully smooth for even drying.
- Rotate baking sheets if using multiple trays.
- Store cooled fruit roll ups rolled in parchment to prevent sticking.