Campfire Cones

There’s something magical about cooking over a campfire, especially when it comes to fun desserts. Campfire Cones are one of the easiest and most exciting treats you can make outdoors. They combine crunchy waffle cones with melted chocolate, gooey marshmallows, and your favorite sweet toppings.
Traditional campfire desserts like s’mores are always delicious, but campfire cones take things to the next level. Instead of just chocolate and marshmallows, you can fill the cone with a mix of candies, fruits, and spreads, creating a warm, melty dessert that everyone can customize.
After making these at countless camping trips and backyard fire pits, I can confidently say that Campfire Cones are always a hit with both kids and adults. They’re quick to assemble, fun to eat, and perfect for summer evenings around the fire.
In this guide, you’ll learn how to make campfire cones step-by-step, along with tips, flavor variations, and serving ideas.
Why You’ll Love This Recipe
These Campfire Cones are simple, fun, and delicious.
-
Perfect campfire dessert – Great for camping trips and bonfires
-
Easy to customize – Fill with your favorite candies and fruit
-
Quick to prepare – Ready in minutes over the fire
-
Kid-friendly activity – Everyone can build their own cone
-
Warm and gooey treat – Melted chocolate and marshmallows inside a crunchy cone
They’re a creative twist on classic campfire sweets.
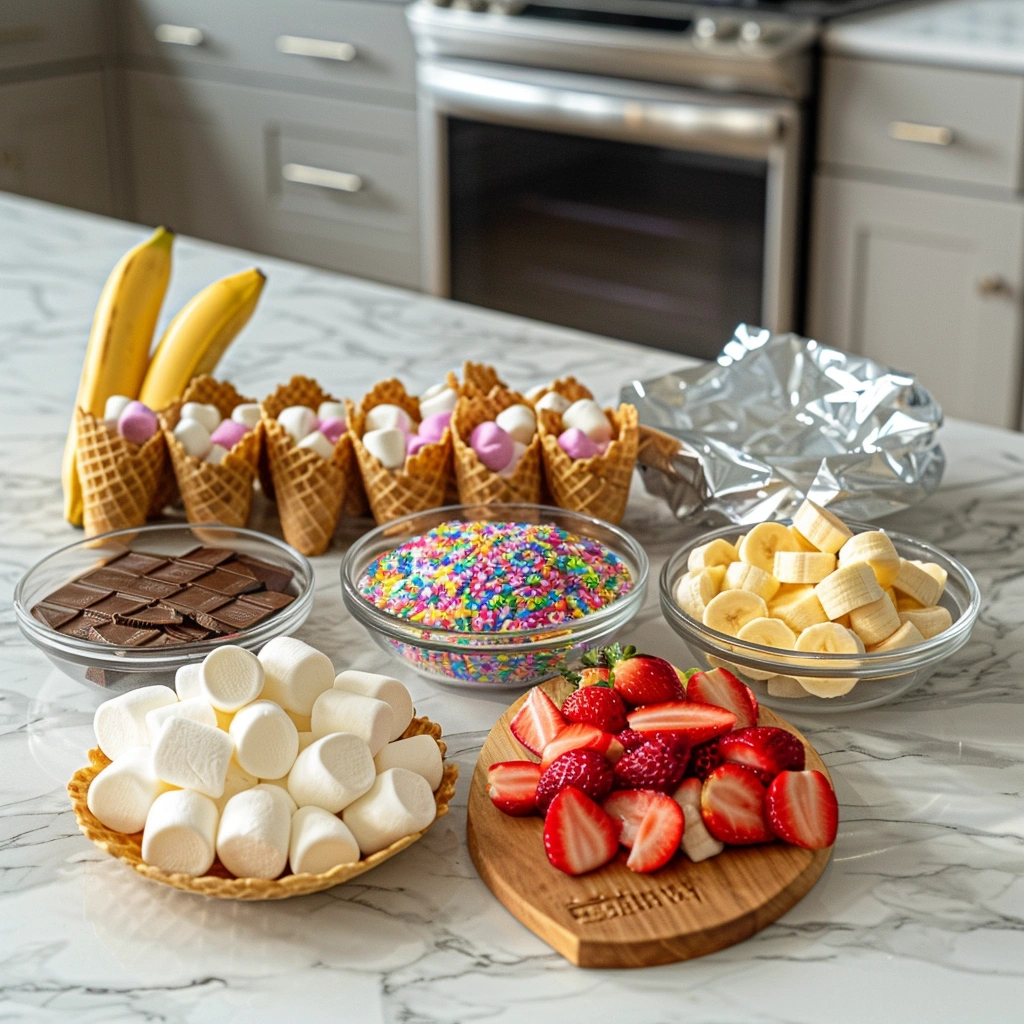
Ingredients & Prep
The ingredients for Campfire Cones are simple and flexible.
Main Ingredients Prep
-
4 waffle cones
-
1 cup mini marshmallows
-
½ cup chocolate chips
Waffle cones work best because they hold their shape while heating.
Seasonings, Sauces, or Flavor Base
These ingredients add extra sweetness and flavor.
-
½ cup peanut butter chips or butterscotch chips
-
½ teaspoon cinnamon (optional)
The cinnamon adds a warm flavor that pairs nicely with chocolate.
Pantry Staples
You can add many fun toppings such as:
-
Sliced strawberries
-
Banana slices
-
Mini candy pieces
-
Caramel sauce
-
Crushed cookies
The more toppings you include, the more customizable the cones become.
Step-by-Step Cooking Instructions
Making Campfire Cones is quick and fun.
Pre-Cooking Prep
Prepare a campfire or grill with medium heat.
Lay out all toppings so everyone can assemble their own cones.
Cooking Method (times & temps)
Fill each waffle cone with layers of:
-
Mini marshmallows
-
Chocolate chips
-
Fruit or candy toppings
Wrap each filled cone tightly in aluminum foil.
Place the wrapped cones near the campfire coals or on a grill.
Heat for 5–7 minutes, turning occasionally.
Doneness or Texture Check
Your Campfire Cones are ready when:
-
The marshmallows are melted
-
The chocolate is soft and gooey
-
The cone feels warm but still crisp
Carefully open the foil to check.
Resting or Final Touches
Let the cones cool for 1–2 minutes before eating.
Optional finishing touches include:
-
Drizzling caramel sauce
-
Adding extra chocolate chips
-
Sprinkling crushed cookies
These toppings make the dessert even more indulgent.
Pro Tips for Perfect Results
These tips help ensure perfect Campfire Cones.
Common Mistakes to Avoid
Overfilling the cone
Too many ingredients can cause the filling to spill out.
Placing cones directly in flames
Cook near the hot coals instead of direct flames.
Not wrapping tightly
Tight foil wrapping helps the ingredients melt evenly.
Recommended Tools
Helpful tools include:
-
Aluminum foil
-
Campfire tongs
-
Grill or fire pit
-
Heat-resistant gloves
These tools make cooking safer and easier.
Storage & Reheating Tips
Campfire Cones are best enjoyed immediately.
However, you can prepare the cones ahead of time and keep them wrapped until ready to heat.
Once heated, they should be eaten while warm for the best texture.
Flavor Variations
You can easily customize Campfire Cones.
Spicy Version
Add a fun twist with:
-
A pinch of cinnamon
-
A small sprinkle of chili powder
This creates a sweet and slightly spicy dessert.
Healthy / Special Diet Option
For a lighter version:
-
Use dark chocolate
-
Add fresh fruit like berries or bananas
-
Reduce candy toppings
This keeps the dessert sweet but less sugary.
Global Flavor Twist
Try international flavor combinations.
Banana chocolate cones
Add:
-
Banana slices
-
Peanut butter chips
Tropical cones
Add:
-
Pineapple chunks
-
Coconut flakes
Both versions bring exciting flavor combinations.
Serving Suggestions
Campfire Cones are perfect for outdoor gatherings.
Best Occasions
Serve them during:
-
Camping trips
-
Backyard bonfires
-
Summer parties
-
Family cookouts
Drink Pairings
Enjoy them with:
-
Hot chocolate
-
Milk
-
Campfire coffee
Dessert Table Idea
Set up a DIY campfire cone bar where guests choose their own toppings.
This makes the dessert interactive and fun.
FAQs
Can I make these without a campfire?
Yes. Campfire Cones can be heated in an oven at 350°F for 7–10 minutes or placed on a grill.
How do I keep the cone from getting soggy?
Use waffle cones and avoid overly juicy fruit. Heating the cones in foil helps protect the crisp texture.
Conclusion
These Campfire Cones are a fun, customizable dessert that turns a simple waffle cone into a warm, gooey campfire treat. With melted chocolate, soft marshmallows, and endless topping possibilities, they’re guaranteed to be a highlight of any outdoor gathering.
They’re easy to prepare, perfect for sharing, and bring a little extra magic to nights around the fire.
Try making campfire cones on your next camping trip or backyard bonfire and watch how quickly they become everyone’s favorite campfire dessert.

Campfire Cones
Ingredients
- 4 waffle cones
- 1 cup mini marshmallows
- ½ cup chocolate chips
- ½ cup peanut butter chips or butterscotch chips
- ½ teaspoon ground cinnamon optional
- Optional fillings
- Sliced strawberries
- Banana slices
- Mini candy pieces
- Caramel sauce
- Crushed cookies
Instructions
- Prepare a campfire or grill with medium heat.
- Lay out all ingredients so everyone can assemble their own cones.
- Fill each waffle cone with layers of mini marshmallows, chocolate chips, peanut butter chips, and optional fruit or candy toppings.
- Wrap each filled cone tightly in aluminum foil.
- Place the wrapped cones near the hot campfire coals or on a grill.
- Heat for 5–7 minutes, turning occasionally to melt the fillings evenly.
- Carefully remove from the heat and open the foil.
- Allow the cones to cool for 1–2 minutes before eating.
Notes
- Place cones near hot coals rather than direct flames to avoid burning.
- Do not overfill the cones so the fillings can melt evenly.
- Wrap the cones tightly in foil to protect the waffle cone and keep the heat inside.
- These treats are best enjoyed warm and freshly melted.